Introduction
Blackberry jam is a delightful treat that captures the essence of summer in every spoonful. Making it the old-fashioned way, without added pectin, allows the natural flavors of the blackberries to shine through. This method is not only traditional but also ensures a more authentic taste.
Ingredients
To make approximately 2 half-pint (8 oz.) jars of blackberry jam, you will need:
- 4 cups fresh blackberries: Ensure they are ripe and free from blemishes.
- 2 cups granulated sugar: This helps in preserving the jam and balancing the tartness of the berries.
- 2 tablespoons lemon juice: Adds acidity, which aids in the gelling process and enhances flavor.
Note: Using fresh blackberries is recommended for the best results. If using frozen berries, thaw them before use.
Preparation
- Sterilize Jars: Wash the jars and lids with hot, soapy water. Place them in a preheated oven at 180°C (350°F) for 10 minutes to sterilize.
- Prepare Berries: Rinse the blackberries thoroughly under cold water. Remove any stems or leaves.
- Mash Berries: In a large saucepan, mash the blackberries using a potato masher or fork until they release their juices.
Cooking the Jam

- Combine Ingredients: Add the mashed blackberries, granulated sugar, and lemon juice into the saucepan. Stir well to combine.
- Cook the Mixture: Place the saucepan over medium heat. Stir the mixture continuously to prevent burning. Allow it to come to a boil.
- Boil: Once boiling, reduce the heat slightly and let it simmer. Stir frequently to ensure even cooking.
Cooking time may vary, but typically it takes about 20-30 minutes for the jam to reach the desired consistency.
Testing for Doneness
To check if the jam has set:
- Cold Plate Test: Place a small plate in the freezer before starting the jam. When you think the jam is ready, drop a small amount onto the cold plate. Return it to the freezer for about 1 minute. Run your finger through the jam; if it wrinkles and holds its shape, it’s done. If not, continue boiling and test again in a few minutes.
Canning and Storing

- Fill Jars: Carefully ladle the hot jam into the sterilized jars, leaving about 1/4 inch of headspace at the top.
- Seal Jars: Wipe the rims of the jars with a clean, damp cloth to remove any residue. Place the sterilized lids on top and screw on the metal bands until they are fingertip-tight.
- Process Jars: Place the filled jars in a boiling water bath, ensuring they are covered by at least 1 inch of water. Process for 10 minutes.
- Cool and Store: After processing, remove the jars and let them cool completely on a clean towel. Once cooled, check the seals by pressing the center of each lid. If it doesn’t pop back, the jar is sealed properly. Store sealed jars in a cool, dark place. Unsealed jars should be refrigerated and used within a few weeks.
Serving Suggestions
Homemade blackberry jam is versatile and can be enjoyed in various ways:
Conclusion
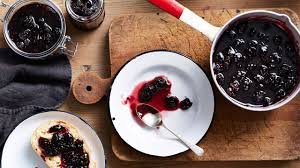
- Spread on toast, biscuits, or scones.
- Swirled into yogurt or oatmeal.
- Used as a topping for pancakes or waffles.
- Incorporated into desserts like cakes or pastries.
Table of Contents
Introduction
Ingredients
Preparation
Cooking the Jam
Testing for Doneness
Canning and Storing
Serving Suggestions
Conclusion
Making old-fashioned blackberry jam without added pectin is a rewarding process that results in a delicious, natural spread. By following these steps, you can enjoy the sweet and tangy flavors of summer all year round. Happy jamming!